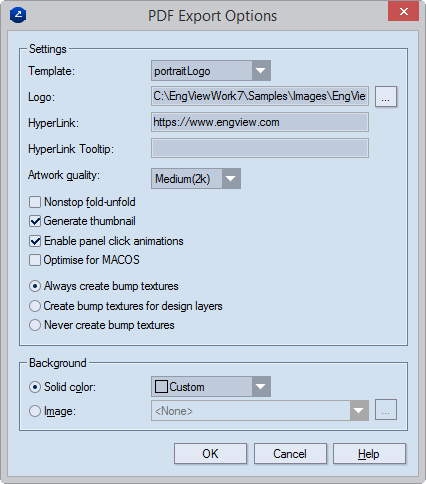
| Settings | General elements of how the exported file will look, including logo placement, animations, and image textures |
|---|---|
| Template | Sets the spatial positioning of the design in the exported
file. The options are:
IMPORTANT: Logos appear best if their width-to-height ratio is 3:1 and their size is no less than 6 cm to 2 cm. If the PDF document is meant for printing, the recommended image quality for logos is 300 DPI or higher. |
| Hyperlink | (Optional) Type the full URL (including the protocol part: http:\\; https:\\; ftp:\\ or other) of a website that you want to associate with the logo. When in the exported filе, you click the logo, your default web browser will open the website. |
| Hyperlink tooltip | (Optional) Type a text that will serve as a hint when the mouse pointer is placed over the logo. |
| Artwork quality | Set the quality in which you want EngView
to export images.
TIP: You can set a quality size of up to 16k, but before setting a size, make sure that the video adapter that will be displaying the exported file supports this quality size. |
| Nonstop fold-unfold | Makes the 3D drawing fold and unfold without stopping.
NOTE: This functionality applies to the phases you set for From and To in the Export dialog box. |
| Generate thumbnail | Makes a thumbnail view of the exported file. |
| Enable panel click animations | When the check box is selected (the default state), in the exported 3D model you can animate individual panels by double-clicking them. Leave the check box empty to prevent this animation. |
| Optimize for macOS | (Not selected by default, except under macOS) Makes proper the visualization of the exported 3D model. |
| Always create bump textures | Select the option if in the exported 3D model you want to see
visualizations of relief surface effects applied on the layers
of the design — for example, cuts or perforating lines.
NOTE: Creases are always visualized. |
| Artwork quality | Set the quality in which you want EngView
to export images.
TIP: You can set a quality size of up to 16k, but before setting a size, make sure that the video adapter that will be displaying the exported file supports this quality size. |
| Create bump textures for design layers | Select the option if in the exported 3D model you want to see visualizations of the relief surface effects applied only to the structural layer of the design — for example, cuts or perforating lines. EngViewPrinect will not display any relief effects applied to other layers — for example, foil, imprint, backing and varnishing. Creases are always visualized. |
| Never create bump textures | Select the option if in the exported 3D model you do not want to see visualizations of relief surface effects applied to the layers of the design. Creases are visualized. |
| Background | Loads a file or a color that serves as the background against which the 3D model will appear in the 3D area. |
| Solid color | Sets the color on which the 3D model will appear in the exported file. |
| Image | Sets the image file that will serve as background for the 3D
model appears.
NOTE: Make sure you place your background images in the dedicated directory: C:\EngViewWork8\Settings\MaterialResources\EnvImages\BackDrop |