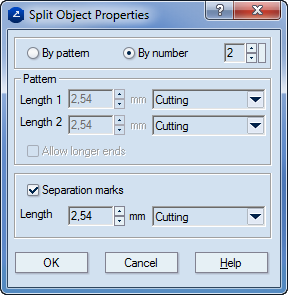
By splitting objects you can break one or several objects into discrete objects, either on the basis of a two-segment style pattern or into a number of equal-length segments. Essentially, splitting objects is the reverse of the Merging duplicated or adjoined objects.
You can split an object according to a pattern of your own choosing. When you split the object, you define a two-segment pattern with two styles (Style1 and Style2) and two length values (Length1 and Length2) — respectively, for the two segment types. A complete pattern starts and ends with the same segment type.
Cases may occur in which the endmost segments are too short, which makes the splitting pattern incomplete — for example, if you split an 8-mm-long line into a pattern with Length1=5 mm and Length2=1 mm.
You can correct an irregular pattern by using longer ends, which extends the shorter segments that are adjacent to the endmost ones.
NOTE: The corrected pattern is made to start and end with the second segment type.

The longer-ends correction is useful in the splitting of a perforating object. Generally, this is achieved by setting the style of the second segment type to Cutting and the style of the first segment type to <none>. This results in alternating Cutting and blank segments. However, due to the length values of the segment types, Prinect may not be able to populate the endmost segments with the second segment type. In such a case, allow longer ends: Package Designer will make the second segment type endmost and longer than it was originally set. In the cited example, the endmost (starting and ending) segments will be in the Cutting style.
Besides by a pattern, you can break an object also into a fixed number of discrete, equal-length segments. You may define a style for the two segment types; the length of all resulting segments is calculated automatically when the overall length of the original object is divided by the specified number.
When splitting an object by a number, you choose the number of the resultant segments. There are two fine the styles — Style1 and Style2. All the segments are of equal length, which is calculated automatically when the overall length of the original object is divided by the specified number. The split pattern always starts with the segment type in Style2.
You can insert separation line segments (separation marks) at every cross point between the resulting segments. They are placed perpendicularly to the original line or to a tangent to an arc. The separation marks can be used also in diemaking, as marks that indicate the positions of the knives.
To split objects
The Split Object Properties dialog box appears.

By pattern Sets splitting by pattern. The selected lines or curves will be partitioned into a pattern of alternating segments of two segment types, each having its own length and style.
By number Sets splitting by number. The selected lines or arcs will be partitioned into a series of alternating segments - two segment types of equal lengths, each with its own style. The length of the segments is calculated by the division of the overall length of the original object by the number of specified segments. For instance, if you have a 10-mm-long line and you specify five segments, the line will be split into five segments, each of them 2 mm long.
Pattern
Length 1 By pattern mode only. Sets the length of the first segment type in the split pattern.
Length 1 Style Sets the style of the first segment type in the split pattern.
Length 2 By pattern mode only. Sets the length of the second segment type in the split pattern. Mostly, this is the segment type with which the pattern starts and ends.
Length 2 Style Sets the style of the second segment type in the split pattern. Mostly, this is the segment type with which the pattern starts and ends.
Allow longer ends By pattern mode only. Corrects incomplete endmost segments that result from the pattern calculation.
Separation marks Separation marks are line segments placed perpendicularly to the original line or arc, at every cross point between the segments resulting from the split procedure. They indicate the places where the segments are connected.
Length Sets the length of the separation marks.
Style Sets the style of the separation mark lines.