Drawing circles by center
You can define a circle by its center, its radius end point, and the diameter.
The contextual edit bars
During drawing and when selected.

 For help on snapping, see Snapping objects.
 Starts the Detect Relations Manager.
The contextual edit bar may appear differently depending on relations options you have set.

Relative Dx and Dy while repositioning.

Attributes
- Diameter. Appears as Diameter in the contextual edit bar.
- Circumference Length. Appears as in the Length column in the
- Radius. Appears in the Data column in the
- Relative Dx and Dy. Appear on the contextual edit bar only while you are repositioning a circle by dragging. Dx and Dy are the relative horizontal/vertical offset distances between the original and the repositioned circle locations as projected on the respective coordinate axis. The Dx/Dy values are, respectively, the Ox/Oy coordinate position of the repositioned circle less the proportional Ox/Oy coordinate position of the original circle.
- Style. For more about styles, see Formatting styles, colors and templates.
- Id. An automatically generated object identifier. Appears in the Id column in the tabular area.
Control points
A circle defined by center has two control points: its center and an arbitrary point that belongs to the circumference. While you are drawing a circle by center, the following cursors for object drawing appear:
 About to draw the center (point) of a circle.
 About to draw the radius (arbitrary point) of a circle.
Tabular presentation
When you have finished drawing a circle, its object type, system-generated Id number, circumference length, radius and style are recorded in the Layers & Objects tab in the tabular area.
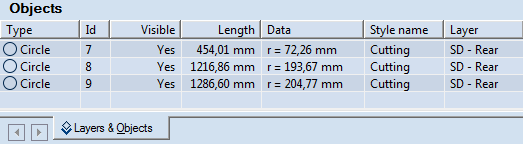
The data in the Layers & Objects tab in the tabular area is unavailable for direct editing.
To draw a circle by center
- Do any of the following:
- On the , click the Circle by Center
 .
.
- On the Objects menu, point to Circles, and then click Circle by Center.
- Press CTRL+D+C+C.
- (Optional) Snap the center point of the circle that you are about to place to another object or point.
- In the graphical area, click to draw the center point of the circle.
- To finish the circle, do one of the following:
- Snap the radius end point of the circle to another object or point.
- Point to where you want the radius end point to be, and then click.
- In the contextual edit bar, in Diameter enter a value, press ENTER, and then click anywhere in the graphical area.
To modify a circle by changing its diameter
- Select the circle.
- In the contextual edit bar, in Diameter enter a new value, and then press ENTER.
To reposition a circle by dragging
- Select the circle.
- Do any of the following:
- Drag the circle to where you want it to be.
- Start dragging the circle and then, in the contextual edit bar, in Dx and Dy enter offset distances relative to the original location of the circle.
- Click to position the circle.
NOTE: If the control points of the circle coincide with the control points of other objects — for example, when the circle is part of a design box or is connected to another object by its circumferential control point — the program repositions the circle and modifies the connected objects depending on the direction and distance at which you drag the circle.