 , and then in the dialog box that appears, choose a new template.
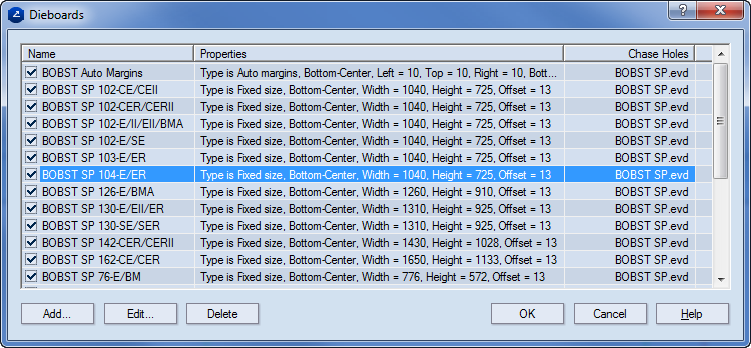
The installation of Package & Display Designer includes a database of predefined dieboards. Each time a dieboard is selected, it can be additionally edited to fit a particular diecutting machine.
NOTE: This editing affects the dieboard as it will be used for the current job. It does not affect the settings of the dieboard as they are defined in the dieboard database. To edit the predefined properties of a dieboard, follow the procedure below.
NOTE ON BOARD TEMPLATES: A board template is a parametric component. It is created with EngView Synergy and can be edited with it. If you need a board template, but do not have EngView Synergy, EngView Systems can create a template to order.
Adding a dieboard to the dieboard database
The Dieboards dialog box appears.
The Add Dieboard dialog box appears.
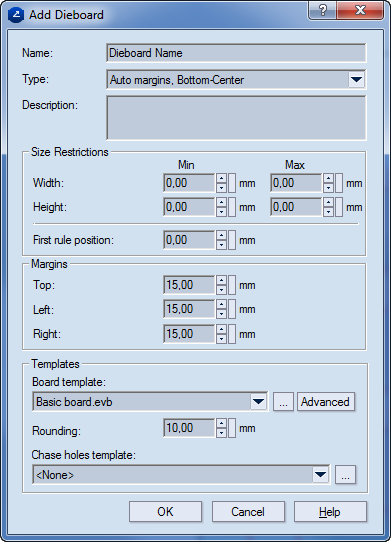
Name Sets the name of the dieboard.
Type Sets the type of the margins: automatic or fixed.
Description An optional text containing notes about the dieboard.
Size restrictions Sets the constraints in which the dieboard's width, height and the position of the first rule may vary.
Width In Min and Max the lowest and highest values of the size of the dieboard are set.
Height In Min and Max the lowest and highest values of the height of the diaboard are set.
First rule position Sets the distance for the position of the first rule.
Margins Settings for the margins of the dieboard
Top Sets the distance for the upper margin.
Left Sets the distance for the left margin.
Right Sets the distance for the right margin.
Templates Settings of the board and chase hole templates.
Board templates Displays the currently loaded board template. To add a new one, click the browse button , and then in the dialog box that appears, choose a new template.
Advanced Opens a dialog box in which the board template profile can be edited.
Rounding Sets the rounding of the dieboard corners. Here, the rounding radius value is entered.
Chase hole template Selects the chase holes template that will be used on the dieboard. To select a different template, click the down arrow, and then in the dropdown list that appears select a template. To add a new template, click the browse button , and then in the dialog box that appears, choose a new template.
Editing a dieboard in the dieboard database
The Dieboards dialog box appears.
The Edit Dieboard dialog box that appears.
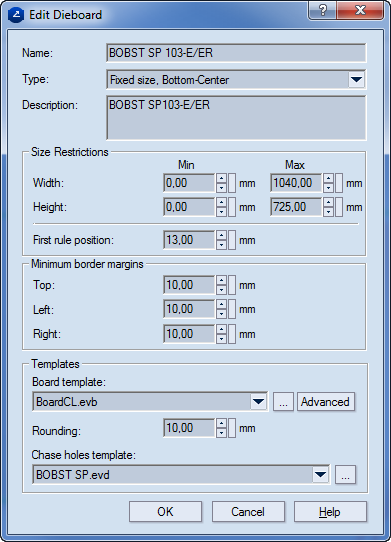
Name Displays the name of the dieboard.
Type Sets the type of the margins: automatic or fixed.
Description An optional text containing notes about the dieboard.
Size restrictions Sets the constraints in which the dieboard's width, height and the position of the first rule may vary.
Width In Min and Max the lowest and highest values of the size of the dieboard are set.
Height In Min and Max the lowest and highest values of the height of the diaboard are set.
First rule position Sets the distance for the position of the first rule.
Minimum Border Margins Settings for the margins of the dieboard
Top Sets the distance for the upper margin.
Left Sets the distance for the left margin.
Right Sets the distance for the right margin.
Templates Settings of the board and chase hole templates.
Board templates Displays the currently loaded board template. To add a new one, click the browse button , and then in the dialog box that appears, choose a new template.
Advanced Opens a dialog box in which the board template profile can be edited.
Rounding Sets the rounding of the dieboard corners. Here, the rounding radius value is entered.
Chase hole template Selects the chase holes template that will be used on the dieboard. To select a different template, click the down arrow, and then in the dropdown list that appears select a template. To add a new template, click the browse button , and then in the dialog box that appears, choose a new template.
Deleting a dieboard from the dieboard database
The Dieboards dialog box appears.