Drawing fillets
You can construct a fillet between two lines or arcs by rounding with an arc the angle of intersection of the two objects (or their projections).
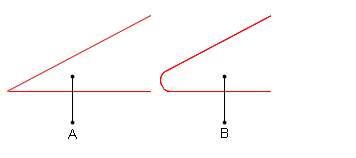
A. Two intersecting lines B. A fillet is constructed at the point of intersection of the two lines.
The contextual edit bars
In the process of drawing and when selected.

Relative Dx and Dy while repositioning the fillet.

Attributes
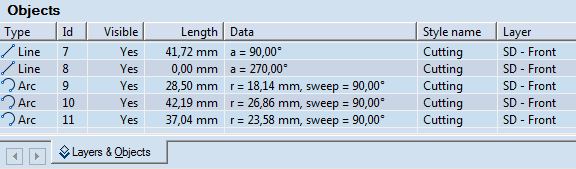
- Radius. Appears as Radius in the contextual edit bar, and as r1 =... in the Data column in the tabular area.
- Sweep (Angle). The angle between the two radii that connect the center of the "parent" circle of the fillet arc, with the starting and the end points of the fillet arc. Appears as sweep=... in the Data column in the tabular area. Can appear as Angle in the contextual edit bar when the fillet is selected and one or both of the two objects that define the fillet are missing, for example, have been deleted or repositioned.
- Circumference Length. Appears in the Length column in the tabular area.
- Relative Dx and Dy Appear on the contextual edit bar only while you are repositioning a fillet by dragging. Dx and Dy are the relative horizontal/vertical offset distances between the original and the repositioned fillet locations as projected on the respective coordinate axis. The Dx/Dy values are respectively the Ox/Oy coordinate position of the repositioned fillet less the proportional Ox/Oy coordinate position of the original fillet.
- Style. Learn more about how to format styles.
- Id. An automatically generated object identifier. Appears in the Id column in the tabular area.
Control points
A fillet has four control points: the starting, middle and end points of the fillet arc, and the center of the "parent" circle of the fillet arc.

Tabular presentation
When you have finished drawing a fillet, its object type, system-generated Id number, circumferential length, the radius of the "parent" circle that the fillet arc belongs to, the angle (sweep) between the two radii connecting the center of the "parent" circle with the beginning and the end points of the fillet, and the style of the fillet are recorded in the Layers & Objects tab in the tabular area.
The data in Layers & Objects tab in the tabular area unavailable for direct editing.
To draw a fillet
- Do any of the following:
- On the , click Fillet
 .
.
- On the Objects menu, point to Features, and then click Fillet.
- Press CTRL+D+F.
- On the contextual edit bar, click Smart Fillet
 .
.
NOTE: You can skip this step and still construct a fillet between the two objects. However, the arc that you'll have drawn will be treated as a simple arc, not as a fillet. (Note the indication in the tabular area.)
- Consider the following cases:
- To construct a fillet between two objects, click consecutively the objects.
- To construct a fillet between two intersecting lines, click the vertex that they form.
An image of the fillet appears, following the mouse pointer.
- In the contextual edit bar, enter a radius value, and then press ENTER.
A list of fillet-positioning choices appears.

- Begin moving the mouse pointer over the positioning choices. As you move over each choice, it is displayed in the graphical area and you can follow
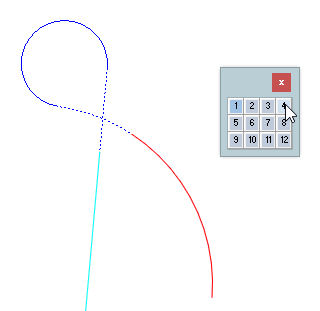
The mouse pointer is on positioning choice 4. The dotted lines indicate how the two objects will be extended and then connected with a fillet (the blue solid line).
- After you have decided on how you want your fillet positioned, click to complete the positioning.
Notes
- When you remove an object that defines a fillet, the fillet is converted into an arc. In the table, the symbol next to its name accordingly.
- If you are drawing a fillet between two intersecting lines, you can define the fillet directly by dragging the vertex to where you want the fillet to be.
- When you drag a fillet in the process of its definition, the program detects all relations with the other objects around. In this way you can use the same fillet mode for creating, for example, a slot fillet.
To modify a fillet
- Select the fillet.
- In the contextual edit bar, enter a radius value, and then press ENTER.
To reposition a fillet
- Select the fillet.
- Do any of the following:
- Drag the fillet in one of the two possible directions.
- In the contextual edit bar, in Dx and Dy, enter offset distances relative to the original location of the fillet.
- Click again to place the fillet in its new location.
NOTE: During repositioning a fillet, when you enter a value in Dx or Dy and then move to the alternative edit box (for example, by pressing TAB or ENTER, Package Designer limits the scope of the fillet preview according to the specified value. Consider the following example:
If during repositioning a fillet by dragging you enter a value of 40 mm for relative Dx offset distance and then press TAB to move to the Dy box, when you point to define the new location of the fillet, Package Designer does not allow you to move the mouse pointer beyond the imaginary vertical borderline stretching at 40 mm rightward from the original fillet's coordinate value along the x-axis. To drag the fillet preview freely, go back into the respective edit box (Dx or Dy), enter 0.00, and then press TAB or ENTER to move to the alternative edit box.
The zero-value rule is valid only for distance values and not for angles, circle diameters, arc radii and radii of auxiliary circles inscribing or circumscribing regular polygons. It applies also to all contextual edit bars for definition of relative Dx and Dy values.
To delete a fillet
- Select the fillet.
- Press CTRL+DELETE.
The program has deleted the fillet and redrawn the original objects.