Drawing regular polygons
A regular polygon is a closed plane figure with three or more equal-sized sides and equal angles.
With EngView , you can construct a regular polygon by means of an auxiliary circle which either inscribes or circumscribes the polygon. The regular polygon may have from three through 99 sides. After a regular polygon has been constructed, each of its sides is treated as a discrete object.
The contextual edit bar
During drawing:

 Learn more about snapping.
 Launches the mode for detecting of relations.
NOTE: The contextual edit bar may appear differently depending on the relations you have set.
Attributes (active and editable in the process of drawing only
- Radius The radius of the auxiliary circle by which the regular polygon is defined.
- Side length The length of the side of the regular polygon. Appears as a read-only field for all sides in the tabular area.
- Angle The angle between the x-axis and the imaginary line that connects the center of the auxiliary circle with the point which you are dragging
- Sides How many sides the plygon will have.
- Polygon type Sets the polygon as inscribed in the auxiliary circle or circumscribing it.
- Style For more about styles, see Formatting styles, colors and templates.
Control points
A regular polygon has no control points. During drawing, the following pointers appear:
 About to mark the center of the auxiliary circle inscribed in/circumscribing the polygon.
 About to draw the regular polygon with the specified attributes.
Tabular presentation
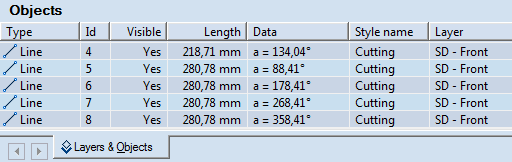
When you have finished drawing a regular polygon, its object types, Ids, lengths, angles against the x-axis and the styles of each side of the polygon are recorded as regular lines in the Objects tab in the tabular area.
NOTE: Learn more about how to draw, modify and reposition regular lines.
To draw a regular polygon
- Do any of the following:
- On the , click Regular Polygon
 .
.
- On the Objects menu, click Regular Polygon.
- Press CTRL+D+R+P.
- (Optional) Snap the center point of the circle that will circumscribe or be inscribed in the polygon, to another object or point.
- In the contextual edit bar, choose the polygon type: inscribed and circumscribed.
- In the contextual edit bar, in Sides enter a value for the number of sides. Value range: 3–99.
- To finish the polygon, do one of the following:
- Snap the second control point of the polygon (it coincides with one of the vertices).
- Drag the mouse from the center of the auxiliary circle until the polygon has the size you want, and then click.
- In the contextual edit bar, do one of the following:
- In R enter a value for the circle's radius.
- In L enter a value for the length of the polygon sides.
- In A enter a value for the angle with x-line of the imaginary line that connects the center of the auxiliary circle with the point which you are dragging.
- Click anywhere in the graphical area.
- To cancel the polygon-drawing mode, do one of the following:
- Press ESC.
- In the graphical area, right-click anywhere, and then click Cancel Mode on the context menu.
To reposition a regular polygon by dragging
- Select the polygon.
- Drag the polygon to the desired location, or directly enter in the contextual edit bar the Dx and Dy offset distances relative to the original location of the polygon.
- Click to place the polygon in its new location.
Notes
- If you select a line from the polygon and drag it, EngView will reposition the line, without breaking the polygon. This will result in the polygon's having a distorted shape.
- In the expressions of object attributes, you can use mathematical functions.
- When you are in a continuous drawing mode, you need not cancel the current mode first in order to begin drawing regular polygons.
- During drawing a regular polygon, in the contextual edit bar when you enter a value in one of the edit boxes (R, L or A) and then you move to the next edit box, the scope of the polygon's preview is limited to the specified value. Consider the following example:
If you place the first point of a regular polygon — for example, the center of the auxiliary circle inscribed in or circumscribing the polygon — enter a value of 50 mm for Radius in the contextual edit bar, and then press TAB to move to the next edit box, when you point to define the regular polygon, Package Designer lets you rotate the regular polygon preview so that the defined 50 mm radius is kept. To drag the object preview freely, in L enter 0.00, and then press TAB to move to the alternative edit box.
The zero-value rule is valid only for distance values.