 button on the contextual edit bar, see Automatic computation of angles.
You can position an object in precise relations to other objects — for example, to draw a line that is parallel to and exactly 23.54 mm from another line. The point that you use to position the object is called relative point and ensures that the object will be at a precise relation to another object. The functionality assists the drawing of objects at places where no fixed positioning is possible in relation to the existing control points.
To set a relative point
As you move the pointer, an dashed line appears, linking the relative point and the starting point of the object you are drawing.
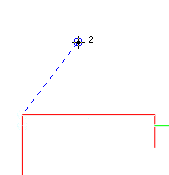
The dashed line indicates that the place where you will click next will be the first point of the object you want to draw.
NOTE: The dashed line is visible only during the setting of a relative point.
Notes
button on the contextual edit bar, see Automatic computation of angles.If you place the starting point of the auxiliary line and then enter a value of 40 mm for Dx, and then press TAB to move to the Dy edit box, when you point to define the location of the resulting offset point, the mouse pointer is limited by the imaginary vertical borderline stretching at 40 mm from the starting point along x-axis. To drag the auxiliary line preview freely, in the respective edit box (Length, Dx or Dy, but not Angle) enter 0.00, and then press TAB to move to the next edit box.
The zero-value rule is valid only for distance values; it applies also for all contextual edit bars for definition of relative Dx and Dy values.