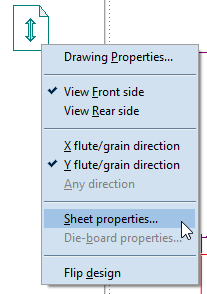
When working in the graphical area, you can use a shortcut panel, called Front/Rear Side Marker, in the graphical area's upper left corner to access the properties, view side and flute/grain direction of designs, as well as access the properties of sheets and dieboards by using. From this panel, you can:
To edit technical and view properties
The marker's context menu appears.

| Drawing Properties | Opens a dialog box in which you can adjust various technical characteristics of the drawing. |
|---|---|
| View Front/Rear side | Switches between viewing the front and the rear sides. NOTE: This will not transform the structure (see the note at Flip design. |
| X/Y flute/grain direction | Change the direction of the material's flute or grain as your situation requires. |
| Sheet/Dieboard Properties | Opens a dialog box in which you can adjust the technical characteristics of the applied sheet and/or dieboard. |
| Flip design | Makes the current front side the rear side, and the other way around. IMPORTANT: This action effectively creates a new structure. In this sense, a confusion might arise between viewing the structure's front or rear side and flipping the entire structure. The former action only gives you a view of the structure's rear side, whereas the latter produces a completely new structure in that the old structure's front and rear sides switch roles and become the new structure's rear and front sides, respectively. |
NOTE: By default, the Front/Rear Side Marker is visible. If for some reason it is not, and you need it, right-click in an empty area, point to Show, and then check Front/Rear Side Marker. To have EngView display the marker by default, on the Tools menu, click Options, and then click the View tab. Then select the Front/Rear side marker check box.