| For | Use |
|---|---|
| Layout | $LayoutN.SheetName()$ |
| 1up | $OneUpN.SheetName()$ |
NOTES: To see the name of the sheet you're using, right-click the sheet's edge, and then click Object Properties. The name appears in the Dimensions group dropdown list.
The following formulas extract information about sheets in 1up and layout drawings.
| For | Use |
|---|---|
| Layout | $LayoutN.SheetName()$ |
| 1up | $OneUpN.SheetName()$ |
NOTES: To see the name of the sheet you're using, right-click the sheet's edge, and then click Object Properties. The name appears in the Dimensions group dropdown list.
In the formulas that follow, the bFallBackToStyle parameter causes EngView to compute the areas of quasi-sheets, areas formed by objects in the Sheet style in drawings that do not have an actual sheet. Most often these are drawings created outside EngView — for example, in the .cf2 file format.
If a drawing contains a sheet, ignore the bFallBackToStyle parameter. For drawings that do not have their own sheet object and you want to compute the area formed by objects in the Sheet style, type true. The examples that follow apply to drawings that do not have their own sheets:
| Expression | What it does |
|---|---|
| $SheetArea()$ | The bFallBackToStyle parameter is in its default state and does not compute an area formed by objects in the Sheet style. |
| $SheetArea(, true)$ | The value of the bFallBackToStyle parameter is true. This computes the area of the bounding rectangle formed by objects in the Sheet style. The area is computed in square millimeters, which is the default measurement unit. |
| $SheetArea(cm, true)$ | The same as the previous example, this time the area is computed in square centimeters. |
| For | Use |
|---|---|
| 1up | OneUpN.SheetArea(Units, bFallBackToStyle) |
| Layout | LayoutN.SheetArea(Units, bFallBackToStyle) |
| To print the sheet area of | Use | Example |
|---|---|---|
| OneUp1 | $OneUp1.SheetArea()$ sq. mm. | 10000.00 sq. mm. |
| OneUp1 | $OneUp1.SheetArea(m)$ sq. m. | 10.00 sq. m. |
| Layout1 | $Layout1.SheetArea(cm); n3$ | 1000.000 sq. cm. |
The formulas that follow return the values of the distances between the sheet's left- and rightmost objects (width) and the top- and bottommost objects (height). The formulas consider the use of stripping rules and structure-irrelevant objects.
| For | 1up | Layout |
|---|---|---|
| Sheet Width | OneUpN.SheetWidth(Units, bFallBackToStyle) | LayoutN.SheetWidth(Units, bFallBackToStyle) |
| Sheet Height | OneUpN.SheetHeight(Units, bFallBackToStyle) | LayoutN.SheetHeight(Units, bFallBackToStyle) |
| To print | Use | Example | Stripping rules & structure-irrelevant objects |
|---|---|---|---|
| Height of OneUp1. | $OneUp1.SheetHeight(); n0$ mm. | 500 mm. | Ignored |
| Width of OneUp1. | $OneUp1.SheetWidth(m); n1$ m. | 0.5 m. | Ignored |
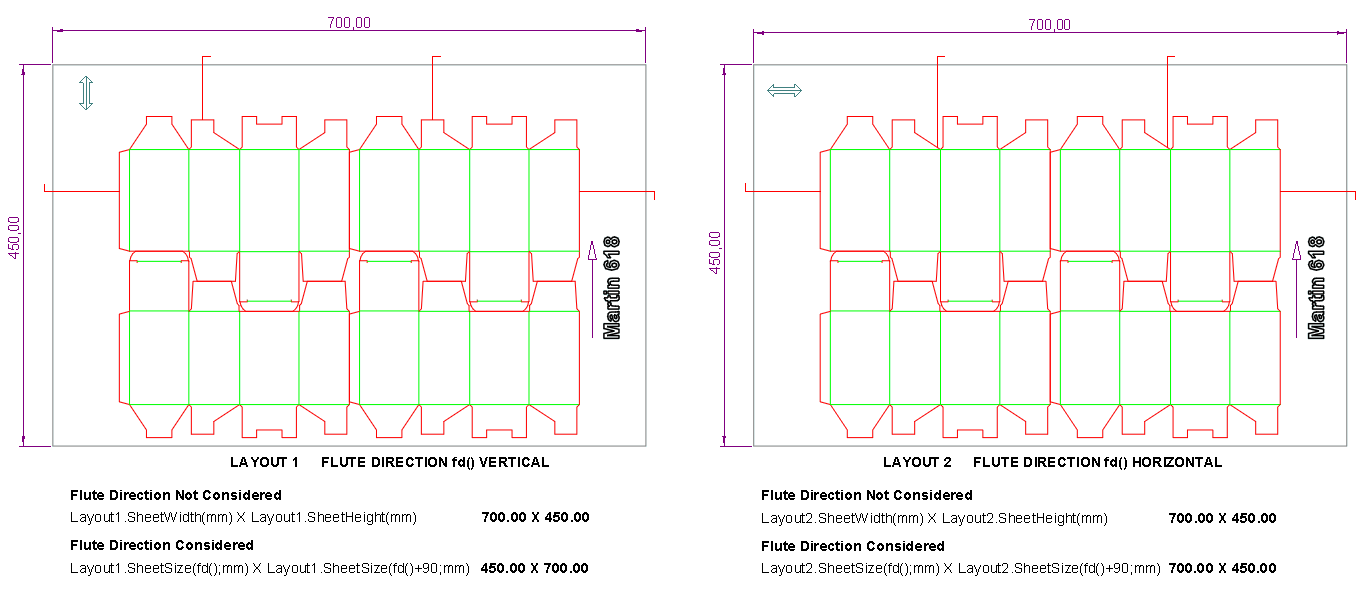
The formulas that follow return the sheet's dimensions as measured along or against the material's flute direction. For example, if the flute direction goes left to right, the formula will return the sheet's horizontal dimension; when the flute direction goes top to bottom, the formula returns the vertical dimension.
IMPORTANT: Do not think of these dimensions as width or height: the flute direction is what determines the measurements.
TO CHECK THE FLUTE DIRECTION: To check the flute direction, go to the respective 1up drawing and look at the flute direction icon in the upper left corner of the graphical area. The arrow there indicates the flute direction.
HOW TO WRITE THE FORMULA:
| To print | Use | Example |
|---|---|---|
| Sheet's size along the flute direction for Layout1. | $Layout1.SheetSize(fd(); m); n3$ m. | 1.000 m. |
| Sheet's size along the flute direction for OneUp2. | $OneUp2.SheetSize(fd(); mm)$ mm. | 1000.00 mm. |
| Sheet's size against the flute direction for OneUp2. | $OneUp2.SheetSize(fd()+90; mm); n0$ mm. | 1000 mm. |
The following example shows the different techniques for extracting a sheet's dimensions using the formulas that ignore the flute direction (SheetWidth and SheetHeight) and the ones that consider them (SheetSize). In the left picture, the flute direction is in the top-to-bottom direction; in the right picture in the left-to-right direction.

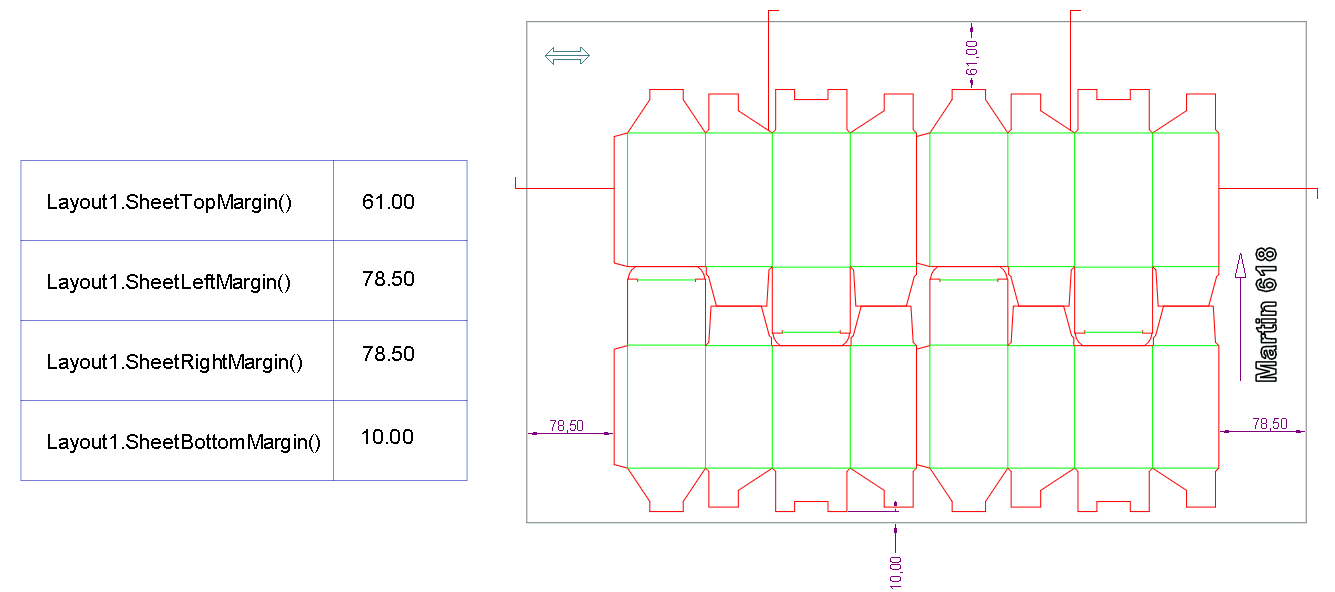
The formulas that follow display the distances between the endmost cutting rules and the sheet's edges for 1up and layout drawings.
| Margin | 1up | Layout |
|---|---|---|
| Left | OneUpN.SheetLeftMargin(Units, bFallBackToStyle) | LayoutN.SheetLeftMargin(Units, bFallBackToStyle) |
| Right | OneUpN.SheetRightMargin(Units, bFallBackToStyle) | LayoutN.SheetRightMargin(Units, bFallBackToStyle) |
| Top | OneUpN.SheetTopMargin(Units, bFallBackToStyle) | LayoutN.SheetTopMargin(Units, bFallBackToStyle) |
| Lower | OneUpN.SheetBottomMargin(Units, bFallBackToStyle) | LayoutN.SheetBottomMargin(Units, bFallBackToStyle) |
| To print | Use | Example |
|---|---|---|
| The left sheet margin for OneUp1. | $OneUp1.SheetLeftMargin()$ mm. | 13.00 mm. |
| The right sheet margin for Layout1. | $Layout1.SheetRightMargin(cm); n1$ cm. | 1.3 cm. |
| The top sheet margin for OneUp1. | $OneUp1.SheetTopMargin(); n0$ mm. | 13 mm. |
| The bottom sheet margin for OneUp1. | $OneUp1.SheetBottomMargin(); f8$ | f8 |
The following example of a layout drawing illustrates how EngViewPrinect uses the formulas to compute sheet margins. The formulas use the default measurement units.
