The task
You set up the production run by modifying the created array taking into account the suggested optimization hints, which guide you about how you can achieve the planned production run with а minimum number of sheets.
How it works
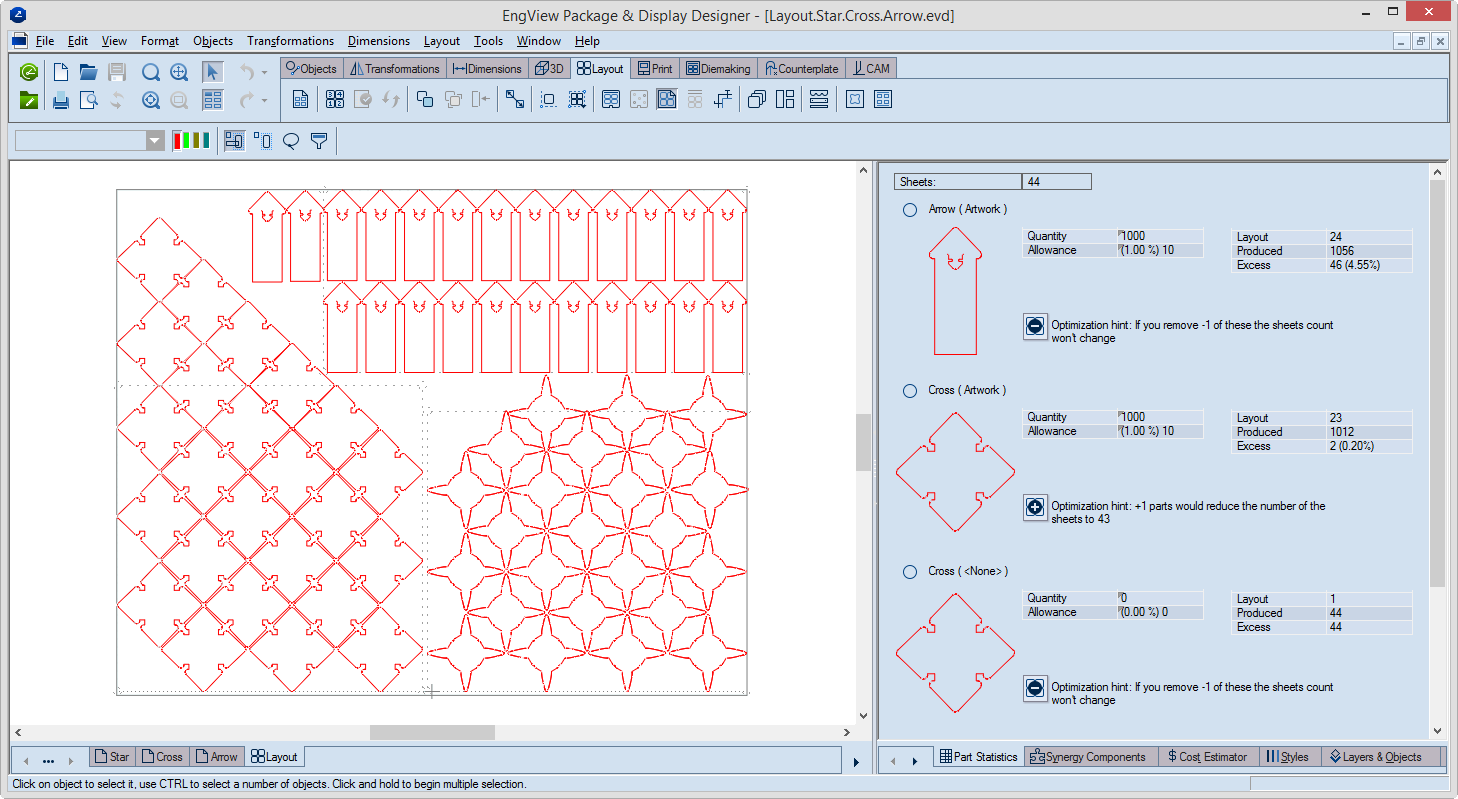
You perform the optimization by entering values in the Quantity and Allowance boxes. The run is then calculated automatically.
Sheets (read-only) Displays how many sheets will be needed for producing the number set in Quantity and Allowance and using the current array. If after the calculation is done, an excess number results, it is listed in the Excess box.
Optimization input (can be edited)
Quantity Enter here how many pieces of the design you want produced.
Allowance Enter here the spoilage percentage. This is the number of pieces (calculated as a percentage of the total run) that you want produced for the purpose of setting up the die and will then be recycled.
Optimization overview (read-only)
Layout Displays how many times the design is featured in the current array.
Produced Displays how many pieces will be produced with the calculated number of sheets (see Sheets).
IMPORTANT: For each 1up, the number in Produced reflects the number in the Layout box multiplied by the number in the Sheets column.
Excess Displays how many pieces of the design will be produced in excess of the calculated production run.
Suggested optimization actions
Optimization hint An optimization hint means that the array can be optimized by, respectively, adding a design to or removing one.
Optimizing the production run
About array optimization
Once you have created an array, you may find that to achieve the production run you want, you will need a count of sheets that will end up outside your budget. To address such a cost-related issue, you can tweak the array in a way that will allow you to have the total count of designs produced on fewer sheets and meeting your budget constraints. The resultant optimization means that you can edit and adjust the array configuration so that the set production run is achieved with the lowest count of sheets.
You do the optimization in the tabular area by means of the optimization hint buttons. They appear at each design when the array configuration allows for optimization — either by adding pieces or removing them.
The numbers in this column offer hints for optimizing the sheet. The numbers are suggestions about how many pieces of the respective 1up can be added (when the number is positive) or removed (when the number is negative) to achieve the optimal production run. TIP: First perform the suggested positive numbers; after this has been done, the sheet is full. Then, if any negative-number hints have appeared, remove the respective number of pieces to avoid overrun (indicated in the Overproduce box). Note also that usually both the addition and removal of parts results in changes in the number of sheets.
Using the optimization hints
Using the Plus sign

The Plus sign indicates that the array can contain more pieces of the design, which will result in the lowering of the total number of sheets required for the production of the run.
To add pieces of a design, click its Plus sign and then, in the array, place the piece where you want it to be.
Using the Minus sign

The Minus sign indicates that if you remove the specified number of pieces from the array, the final count of the sheets will not change.
To remove pieces, click the Minus sign, and then, in the array, click the pieces that you want to remove. They disappear as you click them.