Drawing regular lines
A regular line is a straight line connecting two points in a plane. You can draw a regular line by defining its starting and end points. Then they are automatically connected in a straight line.
The contextual edit bars
During drawing and when selected (basic Dx and Dy).

 For help on snapping, see Snapping objects.
 Starts the Detect Relations Manager.
Relative Dx and Dy while repositioning the line

Attributes
- Length Appears as L in the contextual edit bar and as a read-only Length field in the
- Angle The angle between the line and the x-axis. Appears as Angle in the contextual edit bar and as a read-only field (the Data column) in the .
- Absolute Dx The horizontal distance between the projections of the starting and end points of the line along the x-axis. The Dx value is the x-axis coordinate value of the line's end point less the x-axis coordinate value of the line's starting point.
- Absolute Dy The vertical distance between the projections of the starting and end points of the line along the y-axis. The Dy value is the y-axis coordinate value of the line's end point of less the y-axis coordinate value of the line's starting point.
- Relative Dx and Dy Appear on the contextual edit bar only when you are dragging a line to reposition it. Dx/Dy is the relative horizontal/vertical offset distance between the line's original position and the line's new position as projected on the respective coordinate axis. The Dx/Dy value is the Ox/Oy coordinate position of the repositioned line less the proportional Ox/Oy coordinate position of the original line.
- Style For more about styles, see Formatting styles, colors and templates.
- Id A system-generated, unique object identification number. Appears in the Id column in the tabular area.
NOTE: For help on how to use the Select Quadrant  buttons on the contextual edit bar, see Automatic computation of angles.
Control points
A regular line has two control points: starting and end. During drawing, he following pointers appear:
 About to draw the first point of a line.
 About to draw the second point of a line.
Tabular presentation
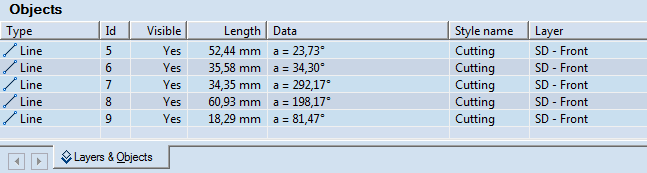
When you have finished drawing a regular line, its object type, Id number, length, angle and style appear in the Objects tab in the tabular area.
The data in the Layers & Objects tab is unavailable for direct editing.
Switching modes: line to arc, arc to line
You can switch from the mode of drawing a regular line to that of drawing a tangent arc, and vice versa.
To draw a regular line
- Do any of the following:
- On the , click Line
 .
.
- On the Objects menu, point to Lines, and then click Line.
- Press CTRL+D+L.
- (Optional) Snap the starting point of the line to another object or point.
- Click where you want the line's starting point to be.
- (Optional) Snap the end point of the line — or the line itself as an object — to another object or point.
NOTE: You can use all snapping modes except Concentric-to.
- Do any of the following:
- Click where you want the end point to be.
- In the contextual edit bar, enter values for L, Angle, Dx and Dy, and then press ENTER or click in the graphical area.
NOTE: When you are drawing a series of connected lines, the end point of a line is the starting point of the next line. When you point to an object, all its control points are highlighted, and you can choose a point from which to draw the next line.
To modify a line by changing its attributes
- Select the line.
- In the contextual edit bar, modify the values, and then press ENTER.
To reposition a line by dragging
- Select the line.
- Do any of the following:
- Drag the line to where you want it to be, and then click.
- In the contextual edit bar, in Dx and Dy enter offset distances relative to the line's original location, and then press ENTER.
NOTE: If a line's control points coincide with the control points of other objects — for example, when the line is part of a design or is connected to another object — EngView repositions the line and modifies the connected objects according to the direction and distance at which you drag the line.