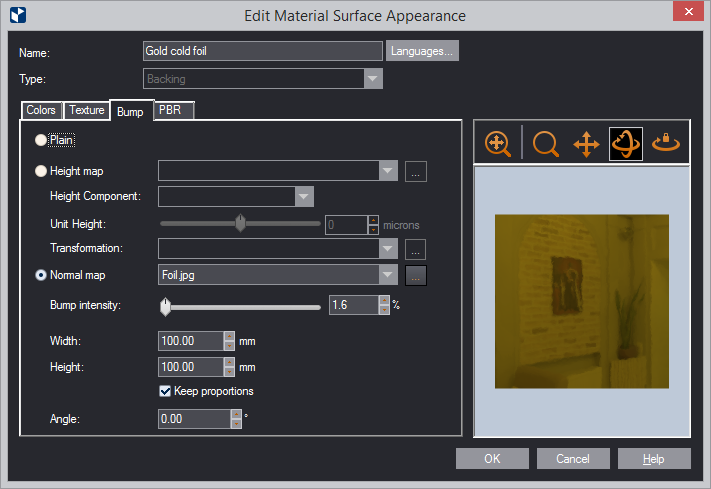
| Languages | Click to add translations of the name of the surface. When you use EngView in this language, you will see the translated name. | |
|---|---|---|
| Plain | Makes the surface appear in a plain color. | |
| Height map | A raster image stored in a greyscale format. These images are suitable for visualizing simple surfaces where heights are clearly distinguished but not too precise. In a height map, a texture is described by each of its pixels having a value from pure white to pure black. The image's white values represent high areas; black values point to low areas. The overall effect is a relief indicated by heights and lows. Because of its limitation to 256 values of gray, it can represent only 256 degrees of height. | |
| Height component | In the drop-down list, select the component (color) that you want to simulate on the map by setting a height. | |
| Unit height | Here, you set a height for the component. Use the slider
or type a value in the value box.
TIP: Use the slider to explore the effect, and then set the value that works for you. |
|
| Transformation | In the drop-down list, select the physical effect that you want to simulate on the surface: convex, concave, flat, or their variants. | |
| Normal map | A normal map is an RGB-defined image created for a specific
surface; it takes into account how light is reflected from
the surface and is thus able to offer the idea of depth. In
the image, each pixel's Red, Green and Blue values (0-255)
correspond to the X, Y and Z directions of a vector that is
a computed model of the real-life vector describing how light
is reflected off a certain point on the surface. The map (image)
itself is an aggregate of all the vector-models on a particular
real-life surface and is a simulated representation of this
surface. In the drop-down list, select the image that works for you, or use the browse button to load your own. |
|
| Bump intensity | Simulates what the surface would look like if it had a relief applied to it: 0 results in an effect characteristic of a flat surface (brightest); 100% in an effect approximating greatest heights (darkest). Use the slider to explore the effect, and then select the one that works for you. | |
| Width/Height | Sets the width/height of the image. | |
| Keep proportions | While you are editing Width or Height, the other dimension changes too, thus preserving the image's original proportions. | |
| Angle | Sets an angle at which the loaded image will be positioned relative to the surface's x-axis. | |
| Icon | Control Name | What It Does |
 |
Fit | Fits the appearance model into the preview area. |
 |
Zoom | Starts zooming inside the preview area. |
 |
Pan | Starts moving the appearance model across the preview area. |
 |
Turn | Starts rotating the appearance model within the preview area. |
 |
Single Axis Rotation | Starts rotating the appearance model along the axis defined by how you move the mouse. |
 |
View Options | Opens a dialog box in which you can set the lighting of the preview area. |
