| Extracts From |
Formula |
| Layout |
$LayoutN.SheetName()$ |
| 1up |
$OneUpN.SheetName()$ |
NOTES: To see the name of the sheet you're using,
right-click the sheet's edge, and then click Object Properties.
The name appears in the Dimensions group dropdown list.
The formulas that follow return the sheet's dimensions as measured
along or against the material's flute direction. For example,
if a formula is configured to measure along the flute direction
and the flute goes left to right, the formula will return the
sheet's horizontal dimension; when the flute direction goes top
to bottom, the same formula will return the vertical
dimension.
IMPORTANT: Do not think of these dimensions
as width or height: the flute direction is what determines the
measurements.
TO CHECK THE FLUTE DIRECTION: To check the flute direction,
go to the respective drawing and look at the flute direction icon
in the upper left corner of the graphical area. The arrow there
indicates the flute direction or check the drawing's properties.
The formula patterns
| Sheet distances by flute direction |
| 1up |
OneUpN.SheetSize(direction, Units, CutBoxIfNoSheet, CutBox,
FallBackToStyle) |
| Layout |
LayoutN.SheetSize(direction, Units, CutBoxIfNoSheet, CutBox,
FallBackToStyle) |
- THE PARAMETERS
- Direction: Must
be specified. Extracts sheet distances with respect
to the material's flute direction. Use fd()
to extract along the flute's direction; use fd()+90
to extract against the flute direction.
- Units: The measurement units in which EngView will
compute the result. To use the default
units, leave the argument empty.
- CutBoxIfNoSheet: (Applies when the drawing does
not have a sheet and the argument FallBackToStyle
is No.) Extracts the distance of the cut
box along/against the flute direction. Values: Yes
= extracts the distance, No = returns 0.
No is the default and can be omitted.
- CutBox: Extracts the distance of the cut box
along/against the flute direction. Values: Yes
= extracts the distance; No = extracts the
sheet distance along/against the flute direction. No
is the default and can be omitted.
- FallBackToStyle: (Applicable only if the drawing
does not have a sheet but only objects in the Sheet style.)
Values: Yes = extracts the bounding rectangle
distance along/against the flute direction defined by
objects in the Sheet style. Most often these are drawings
created outside EngView
— for example, in the .cf2 file format. No
= EngView
does not look for objects in Sheet style; if there is
no sheet, the formula returns 0, unless the CutBoxIfNoSheet
argument is Yes. No is the default
and can be omitted.
- Know your list separator: When typing a formula, make sure you separate
its elements with your computer's list
separator symbol. Yours may be different from the one used in this
guide. Examples (in red):
| With Semicolon |
With Comma |
| $Layout1.Length(Cutting; m; yes);
n2$ |
$Layout1.Length(Cutting, m, yes),
n2$ |
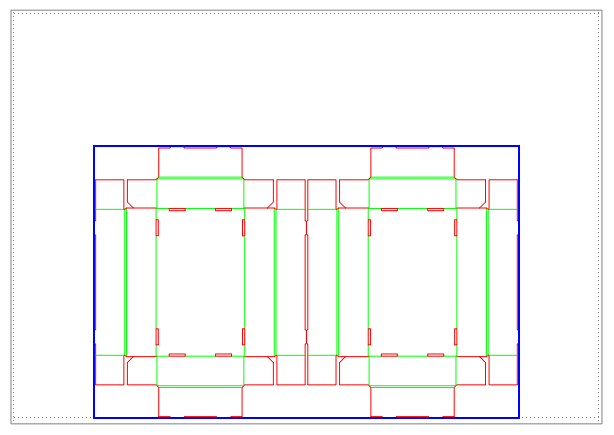
Cut box
- For 1up, the overall dimensions of the design (its bounding
rectangle).
- For layout, the overall dimensions of all parts (marked
in blue):
Example: How flute direction affects the sheet dimensions
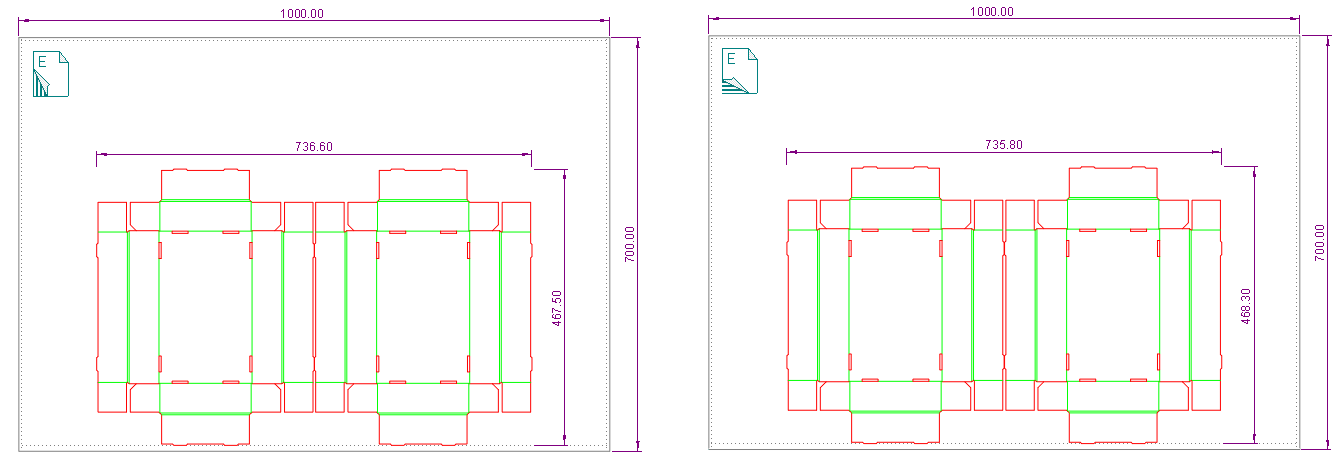
| To print the sheet distances |
| Drawing |
Flute Direction |
Units |
Precision |
Use |
Example fdY |
Example fdX |
| Layout1 |
Along |
Default |
Default |
$Layout1.SheetSize(fd())$ |
700.00 |
1000.00 |
| Layout1 |
Against |
Default |
Default |
$Layout1.SheetSize(fd()+90)$ |
1000.00 |
700.00 |
| |
| To print the distances of a bounding rectangle
formed by objects in the Sheet style (when there is no sheet) |
| Layout1 |
Along |
Default |
1 |
$Layout1.SheetSize(fd(); ; ; ; yes); n1$ |
700.00 |
1000.00 |
| Layout1 |
Against |
Default |
1 |
$Layout1.SheetSize(fd()+90; ; ; ; yes); n1$ |
1000.00 |
700.00 |
| |
| To print the distances of cut box |
| Layout1 |
Along |
Default |
Default |
$Layout1.SheetSize(fd(); ; ; yes)$ |
459.00 |
718.00 |
| Layout1 |
Against |
Default |
Default |
$Layout1.SheetSize(fd()+90; ; ; yes)$ |
718.00 |
459.00 |
The formulas that follow display the distances between the endmost
cutting rules and the sheet's edges for 1up and layout drawings.
| Margin |
1up |
Layout |
| Left |
OneUpN.SheetLeftMargin(Units, SkipInlinerObjects, FallBackToStyle) |
LayoutN.SheetLeftMargin(Units, SkipInlinerObjects, FallBackToStyle) |
| Right |
OneUpN.SheetRightMargin(Units, SkipInlinerObjects, FallBackToStyle) |
LayoutN.SheetRightMargin(Units, SkipInlinerObjects, FallBackToStyle) |
| Upper |
OneUpN.SheetTopMargin(Units, SkipInlinerObjects, FallBackToStyle) |
LayoutN.SheetTopMargin(Units, SkipInlinerObjects, FallBackToStyle) |
| Lower |
OneUpN.SheetBottomMargin(Units, SkipInlinerObjects, FallBackToStyle) |
LayoutN.SheetBottomMargin(Units, SkipInlinerObjects, FallBackToStyle) |
- THE PARAMETERS
- Units: The measurement units in which EngView will
compute the result. To use the default
units, leave the argument empty.
- SkipInlinerObjects: Values: Yes
= Extracts the distances between the endmost non-inliner
objects and the sheet's edges for 1up and layout drawings;
No = takes into account the inliner objects.
See an example. No
is the default and can be omitted.
- FallBackToStyle: (Ap
- FallBackToStyle: (Applicable only if the
drawing does not have a sheet but only objects in the
Sheet style.) Values: Yes = extracts margins
computed by the bounding rectangle of objects in the Sheet
style. Most often these are drawings created outside EngView — for
example, in the .cf2 file format. No = EngView does
not look for objects in Sheet style; if there is no sheet,
the formula returns 0. No is the default
and can be omitted.
- Know your list separator: When typing a formula, make sure you separate
its elements with your computer's list
separator symbol. Yours may be different from the one used in this
guide. Examples (in red):
| With Semicolon |
With Comma |
| $Layout1.Length(Cutting; m; yes);
n2$ |
$Layout1.Length(Cutting, m, yes),
n2$ |
INLINER OBJECTS: Objects in styles to which any of the following
production processes has been set: Creasing Wheel, Glue/adhesive
tape wheel, Tear strip wheel, Reinforcement tape wheel, Half-cutting
wheel, Cutting Wheel, Slot cutting. See an example.
Examples
To print
Examples
To print sheet margins
NOTE: Applicable if there is a sheet.
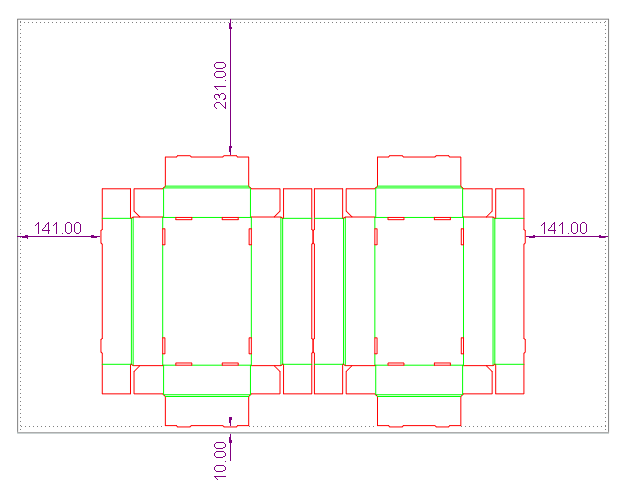
| To print sheet margins |
| Margin to print |
Use, in Layout1 |
Example |
| Left |
$Layout1.SheetLeftMargin()$ |
141.00 |
| Right |
$Layout1.SheetRightMargin(cm); n1$ cm |
14.1 cm |
| Upper |
$Layout1.SheetTopMargin(); n0$ |
231 |
| Lower |
$Layout1.SheetBottomMargin()$ |
10.00 |
To print margins of a bounding rectangle formed by objects
in the Sheet style when there is no sheet
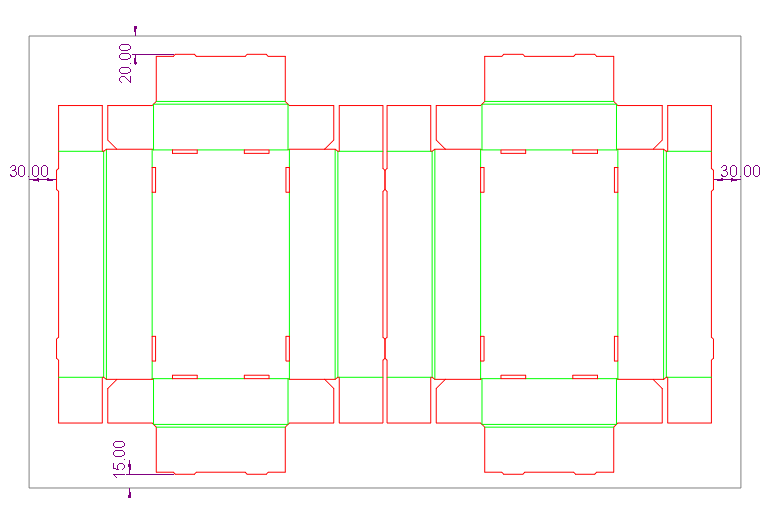
| To print margins of a bounding rectangle formed
by objects in the Sheet style |
| Margin to print |
Use, in Layout1 |
Example |
| Left |
$Layout1.SheetLeftMargin( ; ; yes)$ |
30.00 |
| Right |
$Layout1.SheetRightMargin(cm; ; yes); n1$ cm |
3.0 cm |
| Upper |
$Layout1.SheetTopMargin( ; ; yes); n0$ |
20 |
| Lower |
$Layout1.SheetBottomMargin( ; ; yes)$ |
15.00 |
Margins for inliner products
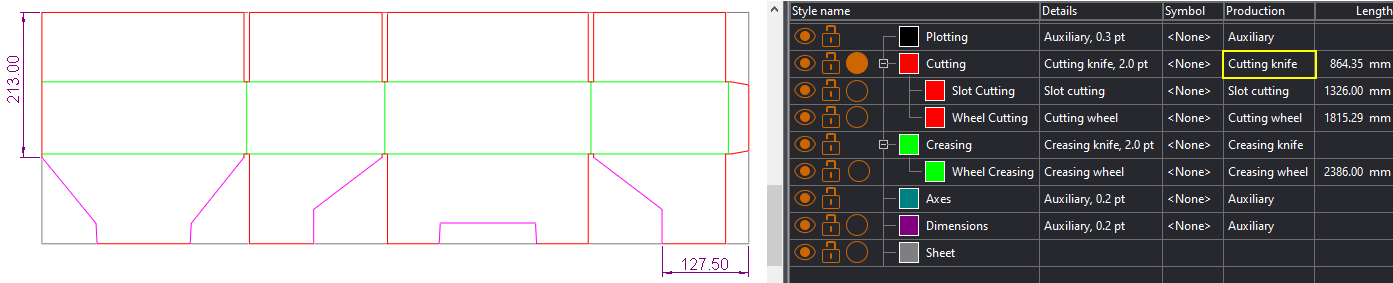
The above structure will be produced on an inliner machne. That
is why, the objects that will be processed will be in styles to
which the production processes Cutting wheel, Creasing wheel and
Slot cutting have been assined. The rest of the objects — in this
case, objects in the Cutting style — will be die-cut. These objects
are selected (in pink). To extract the distance from the edge
of the sheet to the non-inliner objects, use the formulas as follows:
| To print margins |
| Margin |
Sheet |
Use (Layout1) |
| Right |
Yes |
$Layout1.SheetRightMargin( ; yes)$ |
| Upper |
Yes |
$Layout1.SheetTopMargin(cm; yes); n1$ cm |
| Right |
Objects in Sheet style |
$Layout1.SheetRightMargin( ; yes; yes)$ |
| Upper |
Objects in Sheet style |
$Layout1.SheetTopMargin(cm; yes, yes); n1$ cm |