Editing array
You may need to change an array in a sheet by editing its width and height. Also you can edit which 1ups goes where in the sheet and change the pattern.
To edit an array
- Double-click the frame of an array.
The Area Properties dialog box appears.
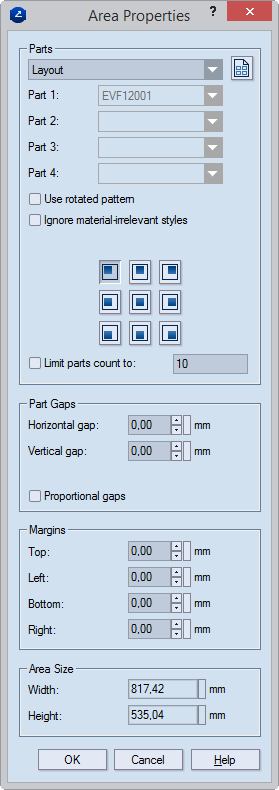
Array Templates: Patterns and Modification The dropdown list contains the available patterns. If you want to use a different pattern, click Modify Template List  , and then, in the wizard that appears, set up a new pattern. The boxes Part 1–4 display the four layout 1ups that are possible to have in an array. Each dropdown lists contains as many layout 1ups as are used in the array. For each part, choose the one that you need.
Use rotated pattern When the check box is selected, the array is rotated at 90 degrees counterclockwise.
Ignore structure-irrelevant objects When this check box is selected, the layout will not include objects that do not affect the structure. Structure-irrelevant objects are:
- All objects outside the Structural layer.
- Structural layer objects in styles to which any of the following production processes has been set: Auxiliary; Glue/Adhesive tape wheel; Tear strip wheel; Reinforcement tape wheel; Wheel gluing; Spot glue gun; Panel separator; Glue area contour; Closed area contour.
Part alignment options In the array's frame, the parts can be aligned as pictured below:

(1) Upper left corner; (2) Left side's middle point; (3) Lower left corner; (4) Upper side's middle point; (5) Lower side's middle point; (6) Upper right corner; (7) Right side's middle point; (8) Lower right corner. To align the parts to the frame's center, use the middle icon.
IMPORTANT: The part alignment functionality has no practical meaning if minimal gaps are set for the array (in the Part Gaps group). The reason is that production-wise the entire sheet needs to be filled with layout 1ups (parts) with the set minimal gaps applied. As a result, avoid using part alignment arrangement when you need to use minimal gaps.
Limit group parts to In the frame, keeps the count of layout 1ups equal to the number set here while preserving the applied pattern. If changes are made to the frame area that make it impossible to fit the set count, a lower count of layout 1ups is used (the applied pattern is still in effect). If horizontal or vertical gaps are set (in the Part Gaps group), they apply. See an example of how the functionality is used.
Part Gaps Sets the gaps between the layout 1ups.
Horizontal gap Sets a gap between the layout 1ups in the left-to-right direction.
Vertical gap Sets a gap between the layout 1ups in the top-to-bottom direction.
Proportional gaps Ensures that the layout 1ups are distributed evenly across the entire area of the array while the vertical and horizontal distances between them are no smaller than the values set in Vertical Gap and Horizontal Gap.
Margins Information about the distances between the area's borders — top, left, bottom and right — to the nearest knife of a layout 1up.
Area Size Sets the area's vertical and horizontal lengths.
Width The area's length measured from its leftmost to its rightmost borders.
Height The area's length measured from its topmost to its bottommost borders.
- Edit the settings as you want them to be.