 .
.You can make and cancel selections by attributes also in zonal selections that you define by using the mouse. You do so by setting additional filtering by attributes such as type, style, color, pattern, length and line width. You can then save the attributes you have set as a preset, and use it the next time you want to perform the same selection.
When you use selection attribute presets, EngView selects objects regardless of the states of the zone buttons.
You can set attributes also to cancel selections — when you have an active selection, setting attributes and then applying them deselects the objects selected earlier that do not match the set attributes.
To set selection attributes
.A contextual edit bar appears above the graphical area.

 .
.A floating dialog box appears.
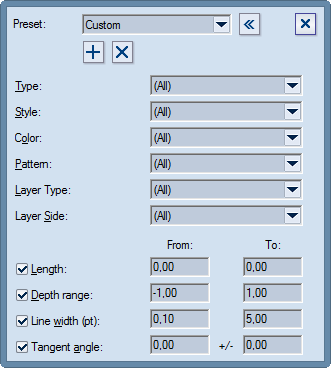
In 1up drawing
In bridges drawings
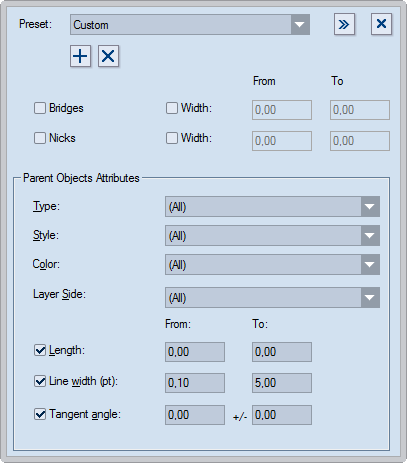
Bridges / Width (bridges drawings only) Select the check box to have the program select bridges. To set specific width values for the selected bridges, select the Width check box, and in From and To type the lower and upper values for the bridges you want selected.
Nicks / Width (bridges drawings only) Select the check box to have the program select nicks. To set specific width values for the selected nicks, select the Width check box, and in From and To type the lower and upper values for the nicks you want selected.
Type Select the type of object that you want to select. NOTE: You can select either one type of object or all types of objects.
Style Select the style in which the objects needs to be. NOTE: If you set a parent style, the objects in that style and the objects in any of its child styles will be selected. If you set a child style, only the objects in the child style will be selected. NOTE: You can select either one style or all styles.
Color Select a color in which the objects need to be. NOTE: You can select either one color or all colors.
Pattern (1up drawings only) Select the pattern that the style has. NOTE: You can select either one pattern or all patterns.
Layer Type (1up drawings only) Select the type of the layer to which you want the selection to be applied: Structural Design, Varnishing, Auxiliary and so on. NOTE: You can select either one or all layer types.
Layer Side (1up drawings only) Select on which side of a layer you want the selection to be applied: front or rear.
For the next four properties, the values in From and To define ranges. The objects that fall in these ranges will be selected when the preset is applied.
Length Define the length that EngView will use to select objects.
Viewing depth (1up drawings only) Sets the stack order of a style. Value range: [–1 to 1]. If multiple objects in different styles overlap, the object in the style with the greatest stack order is visible on the screen and the others are not visible regardless of when each object was drawn. Example: If the Cutting style has a stack order of 0.5 and the Axis style has a stack order of -0.4, when objects in the two styles overlap, the one in the Cutting style will always be visible and that in the Axis style will always be not visible.
This applies also to selections: For overlapping objects, the object in a style with a greater stack order is always visible even if the object in a style with a lower stack order is selected. If objects in styles with the same stack order overlap, you will see the one that is selected.
Line width (pt) Define a width range (in points) that EngView will use to select objects.
Tangent angle Define an angle range for EngView to use for filtering objects.
 .
.A dialog box appears.

EngView saves the preset, whose name appears in the dropdown list.
EngView selects only the objects that correspond to the attributes set in the preset.