 .
.The procedure that follows explains the settings that the integration uses to export 3D models in various file formats.
To export a 3D model
.The Export 3D Options dialog box appears.
File name Click the browse button and select the directory to which you want to save the exported file. In Files of type, select the file type that you want the 3D model exported in.
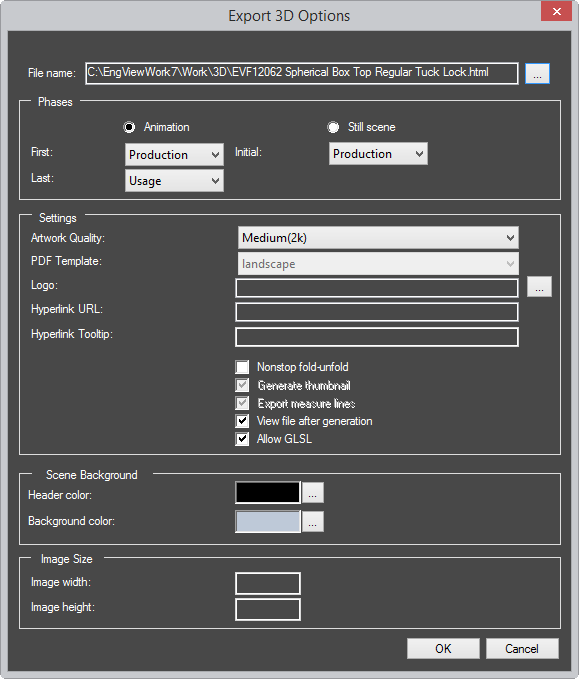
Phases Settings that determine which phases of the 3D model will be included in the exported file, as well as at which phase the file will open.
Animation An animation of a folding sequence is played in the exported file.
First (Animation only) In the exported file, the animated sequence begins from the phase set here.
To (Animation only) In the exported file, the animated sequence ends with the phase set here.
Initial: Sets the phase that appears when the exported file is opened. IMPORTANT: The phase starts at the selected phase's end state. That is, if you want the animation to start at the beginning of a phase, in First select the name of the previous phase: its end state coincides with the initial state of the phase you need. --End-- indicates the end state of the phase set in Last.
Still scene The exported file shows a still scene of the folding sequence as selected in Initial.
Settings (PDF only) The settings in this group apply only when you export to PDF. See File name.
Artwork quality Sets the level of quality for the image in the PDF file: Low (1K), Medium (2K) or High (4K).
PDF Template Sets the spatial positioning of the design in the exported file. The options are:
Landscape has landscape view with the EngView logo. (In this case the Logo check box is unavailable.)
LansdcapeLogo has landscape view with a custom logo that you load in the Logo check box.
LandscapeNoLogo has landscape view without any logo.
Portrait has portrait view with the EngView logo. (In this case the Logo check box is unavailable.)
PortraitLogo has portrait with a custom logo that you load in the Logo check box.
PortraitNoLogo has portrait view without any logo.
Logo Shows image that will be the logo in the exported PDF file. NOTE: To set a logo, close the dialog box, go to Package Designer's 3D model, and then set the image as part of the file-exporting procedure.
Hyperlink URL (Optional) Type the full URL (including the protocol part: http://; https://; ftp:// or other) of a website that you want to associate with the logo. When, in the exported file, you click the logo, your default browser will open the website.
Hyperlink Tooltip (Optional) Type a text that will serve as a hint when the mouse pointer is placed over the logo.
Nonstop fold-unfold Makes the 3D drawing fold and unfold without stopping. NOTE: This functionality applies to the phases set in Start and Last in the Export dialog box.
Generate thumbnail Makes a thumbnail view of the exported file.
Export measure lines Select the check box to export the measure lines added to the 3D drawing. IMPORTANT: When the check box is selected, the measure lines are exported regardless if you have elected to hide them in the 3D work area.
View file after generation Select the check box if you want to view the file has been generated.
Scene Background Settings about the color and the image that will make up the file's background.
Solid color Sets the color against which the 3D model is rendered.
Image Size The image against which the 3D model is rendered. To set an image, close the dialog box, go to Package Designer's 3D model, and then set the image in the View Options dialog box.