.
.NOTE: You can place layout 1ups (parts) into a layout either from the Layout toolbar and from the tabular area (in the Part Statistics tab). Since the two methods share some of actions, the procedure that follows indicates the alternatives.
To insert parts manually
.The Select Layout dialog box appears.
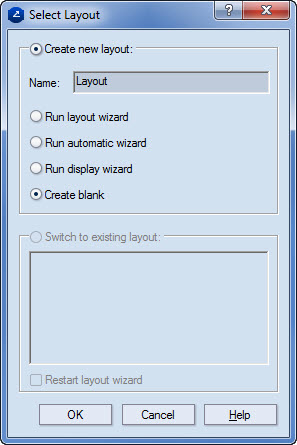
A blank layout drawing opens.
COMMENTARY: In the tabular area, in the Part Statistics tab you can see a list of all the designs in the project and also all the articles prepared for each design. For example, if the project consists of one design for which five articles have been prepared, in the Part Statistics tab you will see six designs: one for the original design and also the design's five article versions. For the layout you proceed by selecting the design you need.
 .
.The Object Properties dialog box appears.
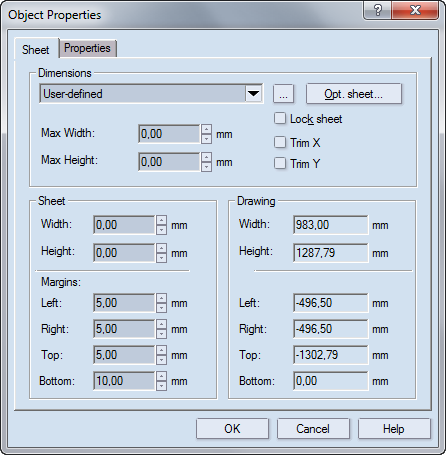
Dimensions Settings for the sheet's size
The dropdown list. A list of the sheets that you can use for the layout. To apply a sheet, in the dropdown list, and then select the sheet that you need. If a specific sheet is selected in the dropdown box and its values are then changed, the selected sheet changes too and User-defined appears. To add a predefined sheet that's currently not on the list, click the browse button  , and then, from the dialog box that appears, select the sheet that you need.
Max Width Sets the maximal horizontal length of the sheet. If a specific sheet is selected in the dropdown list, its width and height values appear in Max Width and Max Length. Changes can be made to the width (in the Sheet area), but it cannot exceed the value set in Max Width.
Max Height Sets the maximal vertical length of the sheet. If a specific sheet is selected in the dropdown list, its width and height values appear in Max Width and Max Length. Changes can be made to the length (in the Sheet area), but it cannot exceed the value set in Max Length.
Opt Sheet Opens a dialog from which you can select a sheet that is calculated as the optimal for the active drawing.
Lock sheet Fixes the size of the sheet and disallows its editing.
Trim X Trims the horizontal excess areas between the endmost edges of the active drawing and the sheet.
Trim Y Trims the vertical excess areas between the endmost edges of the active drawing and the sheet.
Sheet Settings for the sheet's size
Width Sets the sheet's horizontal length. Changes made here override the default width value of a selected sheet.
Height Sets the sheet's vertical length. Changes made here override the default length value of a selected sheet.
Margins Settings for the distances — top, left, bottom and right — between the endmost edges of the active drawing and the sheet.
Drawing (Read-only) Information about the rectangular area that encompasses the array of layout 1ups.
Width The distance between the drawing's endmost horizontal edges.
Height The distance between the drawing's endmost vertical edges.
Margins Information about the area's margins — top, left, bottom and right. Negative values mean that the drawing cannot fit into the selected sheet.
 .
.As you begin placing the design, a contextual edit bar appears above the graphical area.

 .
. to turn it on, and then in Scale X and Scale Y enter scaling quotients.
 . NOTE: See how to use this functionality and how you can benefit from it in the creation of a layout.
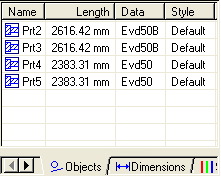
Note: When you insert a layout 1up, its name, the length of its constituent objects, the name of its 1up, and its style are recorded in the Objects tab in the tabular area. To change the name of any part, enter it in the Name column.